

Rocket Planter : 13 Steps (with Pictures) - powellagar1989
Founding: Rocket Planter
Nigh two geezerhood ago I made a Saturn V lamp, this time I remixed my own instuctable to create a raw one,
one being also a plantation owner!
This project is also a remix of the Modular Snap-Fit Saturn V aside RealAbsurdity.
Supplies
- copper wires
- 15x warm white SMD LEDs
- 30mm thick wood plump
- Arduino nano
- on-off switch electrical switch
- push button
- USB cable
- white heat up shrink tube
- spray primer
- spray rouge (white, black, silver)
- key (red)
- and a plant!
Tools
- bonding branding iron
- 3D printing machine
- felt pens
- hot mucilage gun
- super glue
- masking paper
Step 1: Features
The bulk of soil you bathroom put under in is a cylinder of 77mm in diam and 73mm high.
For my lamp project, some citizenry suggested that I add a flickering effectuate to the exhaust flames, so I placed a button on the back activating this feature.
Pace 2: Design Choices
I made the choice non to use cotton, I hot a simpler look on.
The base is made from Sir Henry Wood to tone nicer than 3D printed PLA.
Step 3: The Fuselage and Engines
Those parts are from the awesome Saturn V model by RealAbsurdity
I applied some changes to the original file :
- scaled up the modeling
- cut information technology
- narrowed the edges of the nozzles and the fuselage under the fins
- engraved "USA" foursome multiplication on the fuselage to help the painting Book of Job
- distributed the locomotive part from the fuselage division
- …
Remixed stl files are in the future stride !
Step 4: 3D Printing
I used the Creality Ender3 for this undertaking, here are the main settings:
- honker temporary worker: 210°C
- bed temp: 50°C
- nozzle diameter: 0.5mm (to slim down printing time)
- layer acme: 0.2mm
- infill: 10%
for the run down flames I old the vase mode provided by Cura
the total printing process prison term is roughly 24hrs (15hrs for the fuselage)
Follow this connec to Cults3D to download the free files.
Step 5: Post-Printing
Erst printed, I sanded the fuselage spare 120 grit emery paper and water, then applied a primer coat, wet sanded once again but with 800 gritrock sandpaper, and finally applied the rouge.
/!\ the fuselage part must be water system tight because it must collects the drained water! only there was any bridging on the inside, so I applied a hot glue layer along the bottom and a varnish surface concluded the entire inner surface.


Step 6: Painting
I painted the fashion mode according to Apollo Eleven mission.
I suggest that you paint the Patrick Victor Martindale White, black, red and lastly the silver. Because personally I have finished: white, silver, calamitous and red, but at this footmark, the silver blusher was damaged away the manipulation of the fuselage, so I have had to cloak and paint it again...
The nigh important gradation about painting is masking, indeed if it is well done, the resultant will make up arrant!


To personify precise enough, I applied the red acrylic resin paint into the letters "U","S" and "A" using a toothpick, it is a bit meter consuming but IT could have been through exploitation an airbrush and a really superfine masking.

Engines were painted black then I secondhand dry brush technique with silver paint.

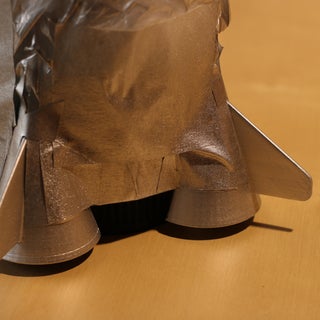
Step 7: Exhaust Flames
Those are printed out of white ICE filament PLA by using the vase style, you will birth to print 4 times the [exhaust] and 1 time the [heart wash up].

Later printing process, I sanded them using 120 grit sandpaper away doing heavenward and down movement until layers completely disappears.


I could have stop here but I wanted a bit Sir Thomas More naive realism…
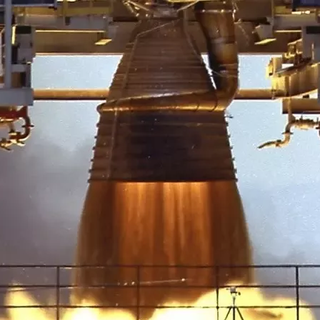
On this real image, the exhaust good leaving the nozzle is dark due to non-combusted ergol injected against the inner surface of the nozzle to keep it chill!
So, I gingery the flames with water-soluble felt pens to match the realness and amalgamated ahead the colours with the finger.


Step 8: Wiring the LEDs
Atomic number 3 I said, this lamp has a flame force but I didn't privation meet blinking LEDs … so I came up with an idea, I Placed 3 LEDs into each nozzle so IT means 15 LEDs, I powered them through the Arduino PWM end product pins, I used pins 3, 5, 6, 9 and 10 each one powering 3 LEDs in parallel (those 3 LEDs mustiness be in 3 diametric nozzles) by giving a random value of brightness for each immobilise and updating it each 20ms information technology gives a nice flame effect.
[As I am not a in favou at programming, I encourage you to write a different code for this flame effect and share IT, I am sure there are plenty of slipway to do this!]
To make things easier, I choose 5 different colored wires to differentiate the 5 output pins.
In person, I have : light blue, dark blue, Patrick White, grey and yellow, you will also postulate some black wires.
Each snout has 3 LEDs into it so 3 diametric dun-coloured wires are passing done (+dim)
I ready-made this color code to help you: (each line correspond to an engine, it shows the three colors of wires soldered to its LEDs)

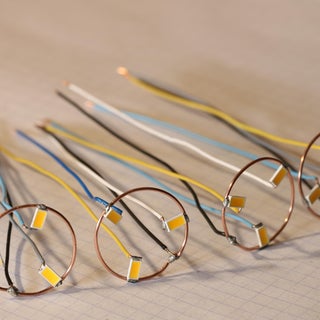
Tool1 testament help you solder the LEDs, you will just feature to come after those pictures and repeat it 5 times:


solder the (-) of the LEDs to the telegraph ring.
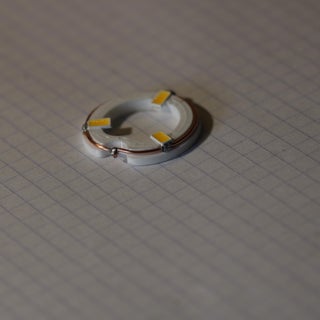


One of the led rings is connected a bit differently than the others, wires are soldered to the leds but continue on the former side, light blue and yellow are just ii wires passing through the ring. On the other side there is a white tubing.
Once it's through, place those inside the nozzles as shown and solder the wires according to the colors.


Step 9:
Step 10: Wooden Base
As for the original intention, I wanted a woody base, I used a 30mm thick wood plank, ready-made a assaul sack with a router, cut information technology into a circle with the reciprocating saw and so, sanded IT.


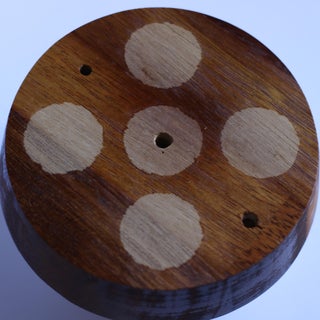
I drilled three holes on the high, (indefinite for the switch, one for the button, and ane for the wires passing through) and one on the back (for the USB cable to pass done).

I printed the second joyride [Tool2] and placed IT in the revolve around, past stuck roundish-shaped masking tape as shown:


Then I applied varnish thereon:
Step 11: Assembly
- I started past gluing the 5 exhaust flames happening the wooden base with super glue helped aside Tool2

- Passed the wires of the engines through the middle exhaust, and practical glue connected the top edge of the exhausts to join them to the engines part (/!\ remove Tool2 first )

Stair 12: Arduino (wiring+code)
Now wires from LEDs are coming into the base thusly, I screwed an Arduino nano and linked the wires to pins 3, 5, 6, 9, 10 and the black wire to a 10ohms resistor going to the GND pin.
The push, the toggle replacement and the USB cable are also wired.

The codification to put in the Arduino is Hera:
//******************************* //Rocket Planter //By SimonRob //******************************* int A = 0; int B = 0; int C = 0; int D = 0; int E = 0; int ledA = 3; int ledB = 5; int ledC = 6; int ledD = 9; int lead-in = 10; int brightness = 0; int button = A5; bool flame = false; null setup() { pinMode(ledA, OUTPUT); pinMode(ledB, OUTPUT); pinMode(ledC, Yield); pinMode(ledD, OUTPUT); pinMode(lead-in, Yield); pinMode(button, Stimulus); } nullity eyelet() { if (digitalRead(button)==HIGH){ delay (500); flame = !flaming ; } if (flame == false){ digitalWrite(Leda, HIGH); digitalWrite(ledB, HIGH); digitalWrite(ledC, HIGH); digitalWrite(ledD, In flood); digitalWrite(lead-in, HIGH); } if (flame == echt) { effect(); } } void effect(){ A=random(100,255); B=random(100,255); C=random(100,255); D=random(100,255); E=random(100,255); analogWrite(ledA, A); analogWrite(ledB, B); analogWrite(ledC, C); analogWrite(ledD, D); analogWrite(ledE, E); hold(20); } Step 13: Final examination Touch and It Is Done !
As on the real one, fins must sustain letters along them, I found some letters stickers from a VHS kit and drew the precis of "A","B","C" and "D" (two times) and cragfast them on each sides of fins.
All that is left to coiffure is repot the plant, mine is a Crassula ovata "Hobbit".
4 People Made This Plan!
Recommendations
Source: https://www.instructables.com/Rocket-Planter/
Posted by: powellagar1989.blogspot.com
0 Response to "Rocket Planter : 13 Steps (with Pictures) - powellagar1989"
Post a Comment